Alright, parents, let's talk about those ever-growing mounds of toys in your kids' rooms. You know the drill: the relentless influx of stuffed animals, plastic cars, building blocks, and… well, you get the picture. It's a toy tsunami, and it's time to tame the chaos. Enter: the DIY toy box!
Not only is it a fantastic way to organize those playful treasures, but it's also a fun project that you can do with your kids. Think of it as family bonding time, sprinkled with sawdust and a touch of paint.
Choosing the Right Materials
Before we dive into the building process, let's talk about the materials. This is where you get to be creative and personalize your toy box. Here's a rundown of common options:
Wood: This is the classic choice for toy boxes. It's durable, sturdy, and readily available. You can opt for pine, cedar, or even plywood for a more affordable option.
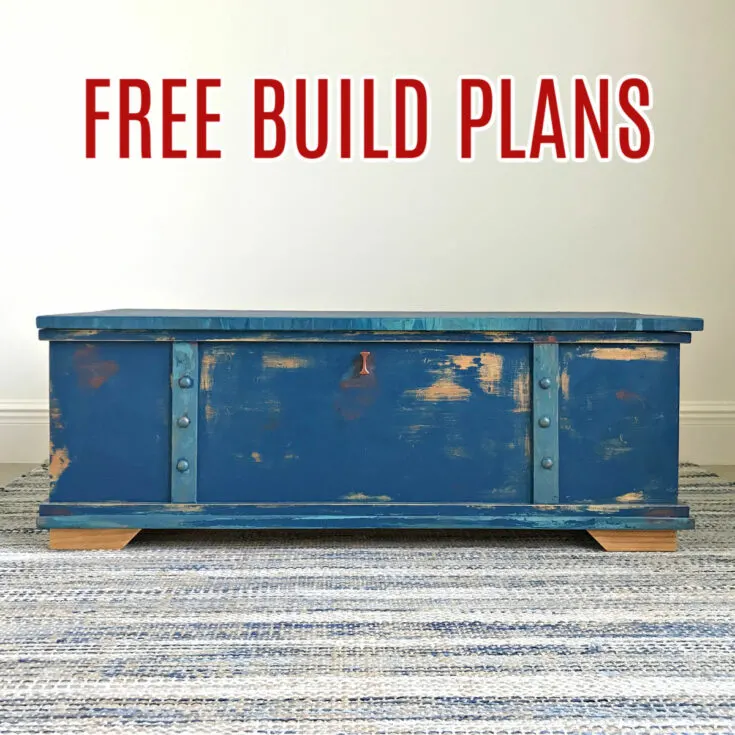
Reclaimed Wood: Give your toy box a vintage charm by using reclaimed wood. This is a great way to add a unique touch and be environmentally conscious.
Metal: Metal toy boxes are robust and can withstand even the wildest of toy battles. Consider using galvanized steel for a rustic look or sleek stainless steel for a modern vibe.
Plastic: While not as aesthetically pleasing as wood or metal, plastic toy boxes are lightweight, waterproof, and easy to clean.
Once you've chosen your material, it's time to decide on the style and size. Are you aiming for a classic, rectangular shape? Or maybe a whimsical, rounded design? Think about the size of your child's room and the amount of toys they have.
The Tools of the Trade
Now, let's gather our tools. You'll need the basics:
Saw: A circular saw or a jigsaw will be your best friends for cutting the wood or metal. If you're working with plywood, a handsaw will do the trick.
Drill: A drill is essential for making holes for screws and hinges.
Screwdriver: This trusty tool will help you assemble the toy box.
Measuring tape: Precision is key when building a toy box, so make sure you have a reliable measuring tape.
Level: A level will ensure that your toy box sits straight and even.
Safety Gear: Don't forget the essential safety gear: goggles, work gloves, and a dust mask.
Time to Build!
Now, let's get into the exciting part â€" building the toy box. This is where you'll need a well-thought-out plan, some patience, and a healthy dose of DIY spirit.
Step 1: The Blueprint
Start by creating a blueprint or a simple sketch of your desired toy box. This will help you visualize the project and determine the exact measurements for each piece.
Step 2: Cutting the Pieces
With your blueprint in hand, carefully cut the wood or metal to the desired size. Make sure your cuts are precise and clean.
Step 3: Assembling the Base
Now, it's time to assemble the base of the toy box. This could be a simple rectangle or a more elaborate shape, depending on your design. Use wood glue and screws to secure the pieces together.
Step 4: Adding the Sides
Once the base is ready, attach the sides to create the box structure. Make sure the sides are even and securely attached to the base.
Step 5: Creating the Lid
The lid is the final piece of the puzzle. Build it using the same methods as the base and sides, ensuring a secure fit.
Step 6: Hinges and Handles
Attach the hinges to the lid and the box. Choose hinges that are sturdy and appropriate for the weight of the lid. Add a handle to the lid for easy access.
Step 7: Finishing Touches
Now, it's time to give your toy box that personal touch. Sand down any rough edges for a smooth finish. If you're working with wood, you can apply a stain or paint to enhance its look.
Adding Extra Flair
Storage Solutions: You can further enhance your toy box by adding compartments or shelves for organization. This is especially useful for separating different types of toys.
Personalized Touches: Decorate the toy box with your child's name or favorite characters. You can also add stencils, decals, or even paint a playful scene on the outside.
Safety First:
Before your child starts using the toy box, make sure the lid is securely attached. Consider adding safety catches or latches to prevent accidental pinching or slamming.
Building a Legacy
Creating a DIY toy box is about more than just organizing your child's toys. It's a chance to build something special, a piece of furniture that will hold memories for years to come.
So, gather your materials, grab your tools, and let the creative juices flow! You'll be amazed by what you can achieve with a little bit of effort and a whole lot of family fun. And remember, the most important part is the shared experience â€" the laughter, the learning, and the bond you build while creating something unique together.


0 comments:
Post a Comment
Note: Only a member of this blog may post a comment.