Wednesday, November 20, 2024

Compact Wine Racks That Are Perfect for Apartments

Compact Wine Racks That Are Perfect for Apartments

Compact Wine Racks That Are Perfect for Apartments

Wine lovers living in apartments often face the challenge of limited space. Finding a stylish and functional wine rack that fits seamlessly into a small living area can be a real struggle. However, there are numerous compact wine racks available that are perfectly designed for apartment living. These racks offer a perfect solution for showcasing your wine collection without sacrificing valuable space.

Types of Compact Wine Racks for Apartments

Compact wine racks come in a variety of styles and designs, each with its unique features and benefits. Here are some of the most popular types:

Wall-Mounted Wine Racks

Wall-mounted wine racks are a popular choice for apartment dwellers as they maximize floor space and add a decorative element to the wall. These racks are available in various materials, from sleek metal to rustic wood, and can be designed to hold a few bottles or an extensive collection. They offer a practical and space-saving solution while adding visual interest to your apartment.

Under-Cabinet Wine Racks

Under-cabinet wine racks are ideal for utilizing often unused space below cabinets. These racks are typically compact and can be easily installed. They are perfect for storing a small collection of bottles and keeping them readily accessible for everyday use. Their unobtrusive design ensures they blend seamlessly with the kitchen or dining area decor.

Stackable Wine Racks

Stackable wine racks offer flexibility and adaptability to suit different space requirements. These racks are designed to be stacked upon each other, allowing you to expand your storage capacity as your collection grows. Their modular design makes them easy to rearrange and move around, providing a versatile storage solution for apartments.

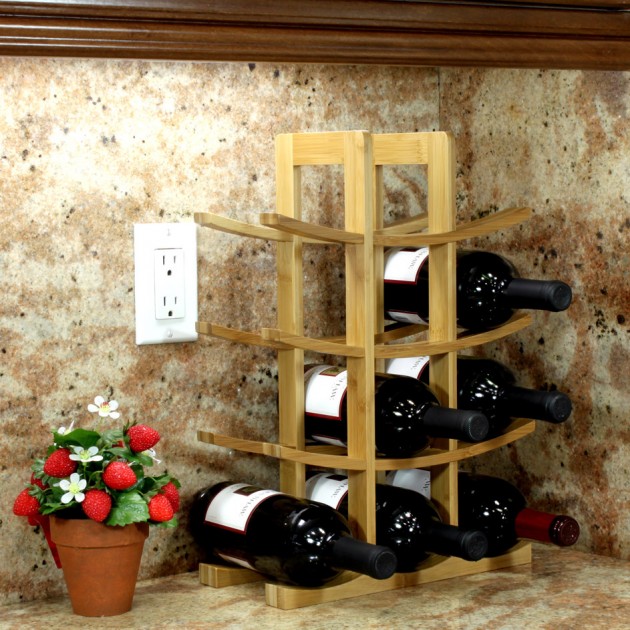
Countertop Wine Racks

Countertop wine racks provide a compact and stylish way to display your favorite bottles. These racks typically hold a few bottles and can be placed on countertops, tables, or shelves. They are perfect for displaying a curated collection of wines that you frequently enjoy. Their small size makes them ideal for apartments with limited counter space.

Wine Bottle Holders

Wine bottle holders are a simple and affordable way to store a few bottles in a compact space. These holders come in various designs and can be placed on shelves, countertops, or even mounted on walls. They are ideal for holding individual bottles and are perfect for apartments with limited storage space.

Factors to Consider When Choosing a Compact Wine Rack

When selecting a compact wine rack for your apartment, consider the following factors:

Storage Capacity

Think about how many bottles you currently have and how many you plan to collect in the future. Choose a rack with sufficient capacity to accommodate your growing collection.

Space Availability

Measure the space where you plan to place the rack and ensure it fits comfortably. Take into account the overall dimensions of the rack, including its depth and width, to ensure it doesn't obstruct walkways or pathways in your apartment.

Style and Design

Select a rack that complements the style and decor of your apartment. Consider the material, color, and overall aesthetic to ensure it blends seamlessly with your existing furnishings.

Budget

Set a budget before shopping for a wine rack and stick to it. Prices for wine racks can vary widely depending on the material, design, and storage capacity.

Ease of Assembly and Installation

Consider the assembly and installation process when choosing a rack. Opt for racks that are easy to assemble and install, especially if you lack experience with DIY projects.

Benefits of Using Compact Wine Racks in Apartments

Using compact wine racks in apartments offers several benefits:

  • Space-Saving: Compact wine racks maximize floor space and keep your apartment clutter-free.
  • Organization: They help you organize your wine collection, ensuring easy access to your favorite bottles.
  • Aesthetic Appeal: They add a touch of elegance and sophistication to your apartment decor.
  • Protection: They protect your wine bottles from dust, sunlight, and other damaging elements.
  • Tips for Organizing Your Wine Collection

    Here are some tips for organizing your wine collection:

  • Sort by Type: Separate your wines by type, such as red, white, and sparkling.
  • Arrange by Vintage: Organize your wines by vintage, placing older bottles in a separate section.
  • Group by Occasion: Categorize your wines by occasion, such as everyday drinking, special occasions, or gifts.
  • Keep a Wine Journal: Record the details of your wines, such as the vintage, producer, and tasting notes, for future reference.
  • Conclusion

    Compact wine racks are a practical and stylish solution for storing your wine collection in an apartment. They offer a space-saving and aesthetically pleasing way to showcase your favorite bottles while keeping them organized and protected. By considering the factors discussed above, you can choose the perfect compact wine rack for your apartment and enjoy your collection in style.

    How to Craft Wall Shelves with Hidden Storage for Maximum Function

    How to Craft Wall Shelves with Hidden Storage for Maximum Function

    Craft Wall Shelves with Hidden Storage for Maximum Function

    Wall shelves are a fantastic way to add storage and style to any room. But what if you could take your wall shelf game to the next level? By incorporating hidden storage compartments, you can maximize function and create a sleek, uncluttered look. This guide will walk you through the process of crafting your own wall shelves with hidden storage, transforming your home into a haven of organization.

    Planning and Design

    Before you dive into construction, take some time to plan and design your shelves. Consider the following:

    1. Determine the Size and Shape

    Measure the wall space you have available and decide on the dimensions of your shelves. Do you need long, narrow shelves or short, wide ones? Will you have one large shelf or multiple smaller ones? Think about the objects you plan to store and choose dimensions accordingly. For hidden storage, you might want to consider making your shelves slightly deeper than standard shelves.

    2. Choose Your Materials

    The material you choose for your shelves will impact both their appearance and their durability. Popular options include:

    • Wood: Offers a warm and natural look and can be stained or painted to match your decor. Pine and plywood are good budget-friendly choices, while hardwoods like oak and maple provide a more luxurious feel.
    • Metal: Provides a modern and industrial aesthetic. Steel or aluminum shelves are strong and durable, and they can be powder coated for a variety of finishes.
    • Acrylic: Offers a sleek, contemporary look and allows you to showcase your belongings. It's a good choice for lightweight items.

    3. Sketch Your Design

    Draw a rough sketch of your shelf design, including the dimensions, any hidden storage compartments, and the placement of hardware. This will help you visualize the final product and ensure everything fits together properly.

    Constructing the Shelves

    With your design in hand, you're ready to begin construction.

    1. Cut the Shelf Boards

    Use a saw to cut the shelf boards to the desired length and width. If you're using wood, make sure to sand the edges smooth to prevent splinters.

    2. Create the Hidden Storage Compartments

    The design of your hidden storage compartments is up to you. You can choose from a variety of options, such as:

    • Pull-out drawers: Create a simple drawer with a box-like structure and a handle for easy access.
    • Drop-down doors: Build doors that hinge at the bottom and swing down to reveal the storage area.
    • Hidden compartments behind a false front: Create a hidden compartment that is accessed by lifting up a panel that looks like the shelf itself.

    Make sure the compartments are sturdy and well-secured to the shelves. Consider adding decorative trim or accents to blend the compartments seamlessly with the rest of the shelf design.

    3. Assemble the Shelves

    Follow your design sketch to assemble the shelves. Use wood glue and screws or brackets to secure the components together. If you're using metal or acrylic, you may need to use specialized connectors or adhesives.

    Installing and Finishing

    Once your shelves are assembled, you're ready to install them on your wall.

    1. Choose the Right Hardware

    Select strong and reliable wall anchors and screws that are appropriate for your wall type and the weight of your shelves. If you're using heavy materials or storing heavy items, you may need to use more robust hardware.

    2. Mark and Drill Holes

    Use a level to ensure your shelves are straight, then mark the location of your wall anchors and drill pilot holes. Drive the anchors into the wall and then attach the shelves to the anchors using the appropriate screws.

    3. Finish the Shelves

    Once your shelves are installed, you can add the finishing touches. If you're using wood, stain or paint it to your liking. Consider adding decorative elements like moldings, knobs, or handles to enhance the overall design. You can also add LED lighting to illuminate the shelves and create a visually appealing effect.

    Conclusion

    Crafting wall shelves with hidden storage allows you to maximize functionality while maintaining a clean and stylish aesthetic in your home. By planning, designing, and constructing your shelves thoughtfully, you can create personalized storage solutions that will meet your needs and add character to your living space.

    Tuesday, November 19, 2024

    How to Get Free Woodworking Plans for Your Next DIY Project

    How to Get Free Woodworking Plans for Your Next DIY Project

    How to Get Free Woodworking Plans for Your Next DIY Project

    Woodworking is a rewarding hobby that allows you to create beautiful and functional pieces for your home and garden. Whether you're a seasoned craftsman or a novice, having access to free woodworking plans can be invaluable. These plans provide detailed instructions, diagrams, and material lists, making it easier to embark on your next DIY project with confidence.

    Fortunately, there are numerous resources available online and offline where you can find free woodworking plans for a wide range of projects, from simple shelves to intricate furniture. In this article, we will explore some of the best places to find free woodworking plans to fuel your creativity and enhance your skills.

    Online Resources for Free Woodworking Plans

    The internet is a treasure trove of free woodworking plans, with websites dedicated to sharing knowledge and inspiration. Here are some of the most reputable online resources:

    Woodworking Websites

    • Ana White: A popular resource for beginner-friendly woodworking plans, Ana White offers a vast library of projects, including furniture, storage solutions, and outdoor structures. Her plans are well-organized, detailed, and often include video tutorials.
    • The Wood Whisperer: Hosted by Marc Spagnuolo, The Wood Whisperer is a comprehensive resource that provides step-by-step plans, detailed instructions, and insightful woodworking tips. The website features a wide range of projects, from simple to advanced, catering to various skill levels.
    • Popular Woodworking: Popular Woodworking offers a wealth of free woodworking plans, including detailed drawings, cutting lists, and assembly instructions. Their plans are well-designed and cover a wide range of projects, from furniture to toys.
    • Woodworking for Mere Mortals: This website, run by Steve Ramsey, provides practical woodworking plans and tutorials, focusing on building functional and beautiful projects. Ramsey's straightforward approach and clear explanations make him a favorite among DIY enthusiasts.
    • Shanty-2-Chic: This website, created by Ashley, features DIY projects for the home, focusing on transforming ordinary pieces into extraordinary ones. Her plans are often budget-friendly and utilize repurposed materials.

    Community Forums

    Woodworking forums are vibrant online communities where enthusiasts share their projects, ask questions, and offer support. You can find numerous free woodworking plans posted by members, along with helpful tips and discussions.

    • Lumberjocks: Lumberjocks is a large and active woodworking community that boasts a vast database of free woodworking plans. You can search for plans by project type, skill level, and materials.
    • Woodworking Talk: This forum provides a platform for woodworking enthusiasts to share their knowledge, ask for advice, and access a wealth of free plans.

    Offline Resources for Free Woodworking Plans

    While online resources are abundant, there are also excellent offline sources for free woodworking plans:

    Libraries and Bookstores

    Your local library likely has a collection of woodworking books and magazines containing free plans. You can also find free plans in the woodworking sections of bookstores, both online and in physical locations.

    Home Improvement Stores

    Home improvement stores often have free woodworking plans available in their stores or online. These plans can be a great source of inspiration for your next project.

    Community Centers and Workshops

    Check with your local community center or woodworking workshops, as they may offer free woodworking plans or classes. These places are excellent resources for connecting with other woodworking enthusiasts and learning new skills.

    Tips for Finding the Right Woodworking Plans

    With so many resources available, finding the perfect woodworking plan for your project can be overwhelming. Here are some tips to help you narrow down your search:

    Determine Your Skill Level

    Consider your woodworking experience and choose plans that match your abilities. Start with simple projects and gradually progress to more complex ones as your skills improve.

    Define Your Project Needs

    Think about the purpose of your project, its size, and the materials you want to use. This will help you find plans that align with your vision.

    Read Reviews and Testimonials

    Before diving into a plan, take the time to read reviews and testimonials from other woodworkers who have completed the project. This can provide valuable insights into the plan's accuracy, clarity, and difficulty.

    Check for Detailed Instructions

    Ensure that the plan you choose provides detailed instructions, diagrams, and cutting lists. Clear instructions will make the building process smoother and more enjoyable.

    Look for Free Support

    Some woodworking plans offer free support through forums or online communities. This can be helpful if you encounter any challenges during the project.

    Conclusion

    Free woodworking plans offer an excellent opportunity to embark on DIY projects without breaking the bank. By exploring the online and offline resources mentioned above, you can find plans that inspire and challenge you, helping you create beautiful and functional pieces for your home and garden.

    Remember to choose plans that match your skill level and project needs, and don't be afraid to seek help from online communities or forums. With the right resources and a bit of creativity, you can unleash your inner craftsman and bring your woodworking dreams to life.

    Monday, November 18, 2024

    Elegant Wine Rack Ideas for Dining and Entertaining

    Elegant Wine Rack Ideas for Dining and Entertaining

    Elegant Wine Rack Ideas for Dining and Entertaining

    Your wine collection deserves a home as elegant as its contents. A well-designed wine rack can transform your dining space into a sophisticated haven, showcasing your curated selection and serving as a conversation starter for guests. Whether you're aiming for a rustic charm, modern minimalism, or a touch of vintage flair, there's a perfect wine rack solution to elevate your dining and entertaining experience.

    Embrace the Wall's Potential

    Wall-mounted wine racks offer a space-saving solution that maximizes verticality. Explore elegant options like:

    Sleek Metal Designs

    Modern and minimalist, metal wine racks can be crafted from stainless steel, copper, or iron, adding a touch of industrial chic to your space. These racks are often designed to showcase individual bottles, allowing for easy access and a dramatic display.

    Rustic Wooden Shelves

    Bring warmth and character to your dining room with wooden wine racks. Natural wood tones, reclaimed barnwood, or aged oak create a charming rustic ambiance. Opt for shelves with varying depths to accommodate different bottle sizes and create visual interest.

    Embrace the Floor's Elegance

    Freestanding wine racks add a sculptural element to your dining space, acting as a focal point while offering ample storage for your collection. Consider these stylish options:

    Curved and Arched Racks

    These racks boast an elegant and sophisticated silhouette, often crafted from metal or wood. Their flowing curves add a touch of whimsy and create an inviting focal point in your dining area.

    Multi-Tiered Display Racks

    Combining storage with display, multi-tiered racks allow you to organize your wine collection by type or vintage. Look for designs that incorporate shelves with different widths and angles to create visual interest and easy access.

    Beyond the Ordinary: Unique Wine Rack Ideas

    For those seeking something truly extraordinary, explore these unique wine rack concepts:

    • Wine Bottle Chandelier: Transform your dining space with a dazzling wine bottle chandelier. This eye-catching fixture offers a unique blend of function and artistry, creating a stunning focal point that will surely impress your guests.
    • Wine Rack Built-in Bar: Create a dedicated wine bar area by incorporating a wine rack into a custom-built bar unit. This seamless integration provides a stylish and practical solution for storing and displaying your collection while creating a dedicated space for entertaining.
    • Reclaimed Wine Barrel: Upcycle an old wine barrel into a rustic and charming wine rack. These barrels add a touch of vintage character and create a one-of-a-kind conversation piece in your dining room.

    Selecting the perfect wine rack for your dining and entertaining space is a journey of style and functionality. Whether you embrace the sleekness of metal, the warmth of wood, or the uniqueness of reclaimed materials, choose a design that reflects your personal taste and elevates the ambiance of your dining space. Your wine collection will surely appreciate its new, elegant home.

    Wednesday, November 13, 2024

    How to Craft Bath Trays for Relaxation and Style

    How to Craft Bath Trays for Relaxation and Style

    Craft Your Own Bath Trays for Relaxation and Style

    Transform your bathroom into a luxurious oasis with a handcrafted bath tray. These versatile pieces can elevate your bath time routine, providing a convenient spot for your favorite essentials while adding a touch of personalized style to your space. Forget about the store-bought options, and unlock your inner artisan as we guide you through the process of creating your own, unique bath tray.

    Choosing Your Materials

    The first step in crafting your bath tray is selecting the right materials. This choice hinges on your desired aesthetic and functionality. Here are some popular options:

    Wood

    Wood is a classic choice for bath trays, offering a natural warmth and durability. Opt for water-resistant varieties like teak, cedar, or redwood, known for their resilience against moisture. You can use pre-cut pieces or experiment with salvaged wood for a unique, rustic touch.

    Bamboo

    Another sustainable option, bamboo is lightweight, aesthetically pleasing, and naturally water-resistant. Its sleek, modern look complements various bathroom styles. Itรข€™s also a cost-effective choice, making it ideal for beginners.

    Acrylic

    Acrylic offers a modern and clean look, with its smooth, non-porous surface. Itรข€™s easy to maintain and available in a wide range of colors and patterns. For a bolder statement, explore acrylic in vibrant hues or with embedded glitter.

    Building the Bath Tray

    With your materials selected, itรข€™s time to start building your bath tray. Hereรข€™s a step-by-step guide:

    Design and Measurements

    Sketch out your desired shape and size on paper. Consider the width of your bathtub and the space you need for your bath essentials. Remember to account for the thickness of the materials youรข€™re using when calculating dimensions.

    Cutting the Material

    Use a jigsaw, circular saw, or handsaw to cut your chosen material according to your measurements. Ensure clean, accurate cuts for a professional finish.

    Assembling the Frame

    For a wooden bath tray, use wood glue and clamps to join the sides and bottom. For acrylic, you can use a strong adhesive or solvent cement. Allow the glue or cement to dry thoroughly before proceeding.

    Adding Decorative Elements

    Enhance your bath tray with decorative elements. This can include:

    • Adding handles for easy carrying.
    • Incorporating a built-in soap dish.
    • Attaching a book rest for enjoying a relaxing read.
    • Adding a built-in glass holder for your favorite beverage.

    Finishing Touches

    After the construction phase, focus on the final details that elevate your bath tray:

    Sanding and Refinishing

    Smooth out any rough edges and imperfections by sanding the tray with progressively finer grit sandpaper. For wood, apply a sealant or varnish to protect it from water damage and enhance its natural beauty. Acrylic trays may need a light polishing to achieve a glossy finish.

    Personalize Your Tray

    Give your bath tray a unique character by adding personal touches. Experiment with:

    • Painting a vibrant design or adding a stencil.
    • Embellishing with decoupage techniques using decorative paper or fabric.
    • Adding a layer of mosaic tiles for a textured, artistic touch.
    • Burning your initials or a meaningful quote into the wood surface.

    Enjoy Your Luxurious Creation

    Congratulations! Youรข€™ve successfully handcrafted a beautiful and functional bath tray that will transform your bath time routine. Now, relax, enjoy your customized oasis, and indulge in the ultimate spa experience.

    Affordable Wood Projects to Start as a Beginner

    Affordable Wood Projects to Start as a Beginner

    Budget-Friendly Woodworking Projects for Beginners: Let's Build Something!

    Hey there, woodworking newbies! You're looking to dive into the world of wood, but maybe your budget isn't quite ready for a fancy table saw or a top-of-the-line router. Don't worry, you can still create amazing things with just a few basic tools and some inexpensive materials. Let's explore some beginner-friendly woodworking projects that won't break the bank.

    Tools You'll Need

    Before we jump into projects, let's talk tools. You don't need a workshop full of fancy equipment to get started. Here's a list of essential tools you can get for a reasonable price:

    • Hand saw: A good hand saw is your go-to for cutting wood to length. You can find a decent one for around $20.
    • Measuring tape: Essential for accuracy. You can snag a decent one for under $5.
    • Pencil: For marking your cuts, and always easier to use than a pen for woodworking.
    • Hammer: For driving nails and securing your projects. A standard claw hammer will do the trick.
    • Screwdriver: A Phillips head screwdriver is a must-have. A set with multiple sizes is super useful.
    • Safety glasses: Protect your eyes, especially when working with power tools. Get a pair for under $10.
    • Work gloves: Keep your hands safe from splinters and rough wood. Find a pair for around $5.

    Once you've got these basics, you can always add more tools as you become more experienced.

    Easy & Affordable Projects to Start With

    1. Wooden Coasters

    These are a super easy way to get started with woodworking. You can use scrap wood or even purchase affordable pre-cut squares from your local hardware store. Just sand the edges, apply a sealant like polyurethane, and you're done! These are great for gifts or adding a personal touch to your home decor.

    2. Simple Picture Frames

    Frame your favorite photos or artwork with a custom-made wooden frame. You can create a simple rectangular frame with just a few cuts and some wood glue. You can even get creative with the design and add some decorative elements, like a small molding.

    3. Wooden Cutting Board

    Cutting boards are a practical and useful project that can add a touch of warmth to your kitchen. You can use a single piece of wood or combine smaller pieces to create a unique design. Just be sure to use food-safe wood like maple or cherry and avoid woods like cedar or pine, which can impart flavor to your food.

    4. Wooden Shelf

    Need some extra storage? Building a shelf is a great way to organize and display your belongings. You can make a simple shelf with just two boards and a few brackets. Or, if you feel ambitious, you can design a more complex shelf unit.

    5. Birdhouse

    Bring some wildlife to your backyard with a homemade birdhouse. It's a great way to learn about basic joinery techniques. There are endless possibilities for design and personalization, and you can even add a decorative roof or a small landing platform.

    6. Wooden Sign

    These can add a personal touch to any space. You can create a sign with your name, a funny quote, or a motivational message. Just cut a piece of wood to your desired size, sand it smooth, and then paint or stain it. Add some lettering with stencils or freehand if you're feeling brave.

    Tips for Working with Wood

    Here are some tips to help you get started with your woodworking journey:

    • Start with softwoods: Softwoods like pine and fir are easy to work with and more forgiving for beginners. They're also more affordable.
    • Measure twice, cut once: Always measure twice before making your cuts. Accuracy is crucial in woodworking.
    • Don't rush: Woodworking is a process that takes time and patience. Enjoy the journey and don't be afraid to make mistakes. You'll learn from them!
    • Safety first: Always wear safety glasses and gloves when working with wood and power tools. Use proper tools and follow safety guidelines.
    • Ask for help: Don't be afraid to ask for help from more experienced woodworkers. There are many resources available online and in your community.

    Exploring Further

    Once you've tackled these beginner projects, you can explore more complex projects, like furniture, decorative boxes, or even small outdoor structures. You can find countless ideas and tutorials online, and there are many woodworking communities where you can connect with others who share your passion.

    Remember, woodworking is a journey, not a race. Enjoy the process, learn from your mistakes, and most importantly, have fun! You'll be amazed at what you can create with a little patience and a lot of creativity.

    Tuesday, November 12, 2024

    Coffee Table Build Guide: DIY PDF Plans for Free

    Coffee Table Build Guide: DIY PDF Plans for Free

    Coffee Table Build Guide: DIY PDF Plans for Free

    Hey there, fellow furniture enthusiast! Ready to tackle your first (or maybe your tenth) DIY project? Building a coffee table is a fantastic way to get your hands dirty, flex your creative muscles, and create a unique piece for your living room. And the best part? You don't need to break the bank for fancy plans รข€" we've got you covered with free PDF plans!

    In this guide, we'll walk you through the whole process, from choosing the perfect design to sanding down the final product. We'll cover everything you need to know, with a sprinkle of tips and tricks along the way. So grab your tools, put on your favorite playlist, and let's get started!

    Choosing Your Coffee Table Design

    First things first, you need to decide what kind of coffee table you envision. Think about the style of your living room, the space you have available, and the materials you'd like to work with.

    Style Inspiration

    • Modern Minimalist: Sleek lines, simple shapes, and a focus on functionality.
    • Rustic Farmhouse: Warm wood tones, distressed finishes, and a touch of industrial charm.
    • Mid-Century Modern: Organic shapes, tapered legs, and a mix of wood and metal accents.
    • Industrial Chic: Exposed metal frames, reclaimed wood, and a raw, edgy aesthetic.

    Don't be afraid to get creative and combine elements from different styles to create your own unique design!

    Free Coffee Table Plans

    Once you have a general idea of the style you're going for, it's time to find some free plans. There are tons of resources online, including:

    • Ana White: A popular DIY blogger with a wide variety of free plans, including coffee tables.
    • Pinterest: A visual search engine where you can find countless DIY projects and coffee table designs.
    • Instructables: A website dedicated to sharing DIY projects, with detailed instructions and photos.

    Spend some time browsing these resources, saving the plans you like to a folder for easy access.

    Gathering Your Materials and Tools

    With your plans in hand, it's time to gather your supplies. Here's a general list, but remember to refer to your specific plans for exact quantities:

    Materials:

    • Wood: Choose a wood type based on your design and desired aesthetic. Popular options include pine, oak, maple, and plywood.
    • Hardware: This includes screws, nails, wood glue, and any special hardware like hinges or drawer slides.
    • Finish: Select a finish that complements your wood and style, such as paint, stain, or varnish.

    Tools:

    • Saw: You'll need a saw to cut your wood to the desired size. A circular saw or table saw is ideal for straight cuts, while a jigsaw is helpful for curved cuts.
    • Drill: A drill with various bits is essential for drilling pilot holes and driving screws.
    • Sandpaper: Use sandpaper in various grits to smooth out the wood and prepare it for finishing.
    • Measuring Tape and Pencil: These are essential for accurate measurements and marking.
    • Clamps: Clamps will help hold your pieces together while you glue or screw them.

    Building Your Coffee Table

    Now for the fun part รข€" building your coffee table! Follow the steps outlined in your plans carefully. Here are some general tips:

    • Measure twice, cut once: Accuracy is key, so double-check your measurements before cutting your wood.
    • Use a work surface: Work on a stable surface to ensure your cuts are precise and safe.
    • Use pilot holes: Always drill pilot holes before driving screws to prevent wood splitting.
    • Apply glue liberally: Wood glue helps strengthen joints and create a more durable piece.
    • Sand thoroughly: Sanding smooths out any rough edges and prepares the surface for finishing.

    Finishing Touches

    Once your coffee table is assembled, it's time to give it that final touch.

    Staining or Painting

    If you're staining, apply a thin, even coat, and let it dry completely before applying a second coat if necessary. If you're painting, apply two coats of paint for a smooth, even finish.

    Sealing

    After staining or painting, seal your coffee table with a polyurethane finish. Polyurethane protects the wood from scratches, spills, and moisture.

    Enjoy Your New Coffee Table!

    Congratulations! You've successfully built a beautiful and unique coffee table. Sit back, relax, and enjoy your creation. Remember, the best part of DIY is seeing your vision come to life. Now go forth and create something amazing!

    How to build a firewood rack from pallets

    How to build a firewood rack from pallets

    Building a Firewood Rack from Pallets: A DIY Guide

    Let's face it, we all love a good fire, especially when the weather turns chilly. But what happens when you've got a pile of firewood taking up precious space in your garage or backyard? That's where a firewood rack comes in, and guess what? You can build one yourself using those trusty old pallets you've been saving! It's a simple, eco-friendly, and wallet-friendly project that will add a rustic charm to your outdoor space.

    Building a firewood rack from pallets is a great way to put those discarded pallets to good use. It's a fun, easy DIY project that can be customized to fit your needs and style.

    Gathering Your Supplies

    Before you start hammering and sawing, you'll need to gather your supplies. You'll need:

    • Two pallets, preferably in good condition.
    • A saw (circular saw or handsaw)
    • A hammer
    • Screws (3-inch or longer)
    • A drill with a drill bit that matches your screw size
    • Safety glasses
    • Gloves (optional, but recommended)
    • Measuring tape
    • Pencil
    • Wood stain or paint (optional)

    Choosing the Right Pallets

    Not all pallets are created equal. Here's what to look for when selecting your pallets:

    • Look for sturdy pallets. You want pallets that are in good condition with no cracked or broken boards. Avoid pallets that look damaged or have been exposed to the elements for too long.
    • Check the wood type. Most pallets are made from softwood like pine or spruce, but you may find hardwood pallets which are even sturdier.
    • Consider the size. Choose pallets that will comfortably accommodate your firewood stack. You may want to measure the height and width of the space where you'll place your rack.

    Keep in mind that pallets are designed for shipping and may contain nails or staples. Always be careful and wear safety glasses when handling pallets!

    Preparing Your Pallets

    Once you've chosen your pallets, it's time to prepare them for construction. Here's what you'll need to do:

    • Remove any loose boards. Look for any boards that are cracked, broken, or wobbly. If any boards are loose, you can try to hammer them back in place, but it's a good idea to replace them if they are severely damaged.
    • Remove any nails or staples. Use a hammer or a nail puller to remove any nails or staples that might be protruding from the pallets.
    • Clean the pallets. If the pallets are dirty or dusty, use a brush or a damp cloth to clean them. You can also sand down the pallets to create a smoother surface if you want.

    Building Your Firewood Rack

    Now for the fun part! Here's how to build your firewood rack:

    Step 1: Layout and Measurement

    Lay down the first pallet on a flat surface. This will be the base of your firewood rack. Measure the width of the pallet and mark a line down the center of the second pallet. This line will help you align the second pallet with the first. You can choose to place the pallets vertically or horizontally, depending on your preference and the size of your firewood logs.

    Step 2: Attaching the Second Pallet

    Place the second pallet on top of the first pallet, making sure the center lines align. Secure the two pallets together using screws. Start by attaching the center boards of the top and bottom pallets, then work your way out towards the ends. Be sure to use screws that are long enough to go through both pallets.

    Step 3: Adding Additional Support (Optional)

    For extra stability, you can add additional supports to your firewood rack. This is especially useful if you plan on stacking heavy firewood. To add support, take a board from one of the pallets and attach it to the underside of the top pallet, creating a shelf-like structure. You can also use extra boards to create more shelves to maximize storage space.

    Step 4: Finishing Touches

    Now it's time to give your firewood rack a finishing touch. You can leave the rack as is for a rustic look, or you can stain or paint it to match your outdoor decor. If you choose to stain or paint the rack, be sure to let it dry completely before you start stacking your firewood. You can also consider adding some hardware to help keep your firewood organized, like metal hooks or bars.

    Storing Your Firewood

    Once your firewood rack is built, you can start stacking your firewood! Here are a few tips for storing firewood effectively:

    • Stack your firewood in a dry place. Wood will rot and mold if it is constantly exposed to moisture. If you live in a humid climate, you may want to cover your firewood rack with a tarp or plastic sheeting.
    • Keep your firewood off the ground. Stacking your firewood on a rack or platform will keep it off the ground and help prevent it from absorbing moisture.
    • Stack your firewood tightly. Tightly stacked firewood will help to prevent it from falling apart.
    • Leave some space between the stack and the rack. Leaving a few inches of space between the stack and the rack will help air to circulate, which will help keep the wood dry.
    • Organize your firewood by type. If you burn different types of wood, it can be helpful to organize your firewood by type. This will make it easier to grab the right type of wood when you need it.

    Safety Precautions

    Building a firewood rack from pallets can be a fun project, but it's important to take some safety precautions:

    • Wear safety glasses and gloves. These will protect your eyes and hands from splinters and other potential hazards.
    • Be careful when handling pallets. Pallets can be heavy and unwieldy. Make sure you have a firm grip and a clear workspace.
    • Use a saw and drill with care. Always use a saw and drill according to the manufacturer's instructions. Never force the saw or drill, as this could lead to injuries.

    Remember, building a firewood rack from pallets is a fun and rewarding project! By following these steps, you can create a sturdy, stylish, and functional firewood rack that will keep your firewood organized and dry. Enjoy your new rack and the warmth of your fire!

    Diy wood desk for your bedroom: a simple and elegant build

    Diy wood desk for your bedroom: a simple and elegant build

    DIY Wood Desk for Your Bedroom: A Simple and Elegant Build

    Crafting a personalized desk for your bedroom can be an immensely rewarding project, offering both aesthetic and functional benefits. This guide will walk you through the process of constructing a simple and elegant wood desk, providing detailed instructions and practical tips to help you achieve a satisfying outcome.

    Materials and Tools

    Before embarking on this project, ensure you have gathered the necessary materials and tools for a smooth construction experience. Here's a comprehensive list:

    Materials

    • Wood: Choose a durable and attractive wood type for your desk top and legs, such as oak, maple, or pine. Consider using pre-cut lumber for ease of construction, or purchase longer boards and cut them to size.
    • Wood glue: Use a high-quality wood glue for strong, long-lasting bonds.
    • Screws: Select screws appropriate for the wood thickness and desired strength.
    • Sandpaper: A range of grits, from coarse to fine, is needed for sanding the wood surfaces.
    • Wood stain or paint: Choose a finish that complements your bedroom decor and personal preferences.
    • Polyurethane or varnish: Apply a protective layer to seal the wood and enhance its durability.
    • Measuring tape: Essential for accurate dimensions and cutting.
    • Pencil: For marking cutting lines and other measurements.
    • Saw: Choose a saw appropriate for your wood thickness, such as a circular saw, jigsaw, or handsaw.
    • Clamps: Needed for holding wood pieces together during gluing and assembly.
    • Drill: A drill is crucial for creating pilot holes for screws and for driving screws accurately.
    • Level: Ensure your desk top is level and stable.
    • Safety glasses: Protect your eyes while sawing and sanding.

    Planning and Design

    Start by sketching out a basic plan for your desk, considering its desired dimensions and functionality.

    Dimensions

    Measure the available space in your bedroom to determine the maximum dimensions for your desk. Consider factors such as the size of your monitor, keyboard, and other items you'll place on the desk. A standard desk height of 29 inches is generally comfortable for most users.

    Design

    Choose a design that aligns with your personal style and the overall aesthetic of your bedroom. You can opt for a simple rectangular desk with straight legs, or explore more intricate designs involving curved edges or decorative elements.

    Construction

    Once you have a design plan, follow these steps for construction:

    Cutting the Wood

    Using your saw, carefully cut the wood pieces according to your measurements. Remember to account for any necessary allowances for joints and finishes.

    Building the Legs

    For simple legs, cut four pieces of wood to your desired length. If you're using a more elaborate design, construct the legs according to your plans. Make sure the legs are stable and square by checking with a level.

    Assembling the Frame

    Create the frame of your desk by joining the legs using wood glue and screws. Align the legs carefully, ensuring they are parallel and at the correct distance apart. Clamp the pieces together while the glue dries.

    Adding the Top

    Attach the desk top to the frame using glue and screws. If you're using a pre-made desk top, ensure it's cut to the correct dimensions. If building your own top, ensure the wood pieces are joined securely.

    Finishing

    Once your desk is assembled, refine its surface and apply a protective finish:

    Sanding

    Thoroughly sand the entire surface of your desk, starting with coarse sandpaper to remove any rough edges or imperfections. Gradually transition to finer grits to achieve a smooth finish.

    Applying Stain or Paint

    Apply stain or paint according to the manufacturer's instructions, ensuring even coverage. Multiple thin coats are generally better than one thick coat.

    Sealing

    After the stain or paint has dried completely, apply a layer of polyurethane or varnish to protect the wood from scratches, spills, and wear. Use a soft brush or cloth to apply the sealant evenly.

    Adding Personal Touches

    Enhance the look of your desk and personalize it with additional features:

    Drawers or Shelves

    You can add storage compartments like drawers or shelves to your desk. Consider adding a drawer to store stationery, pens, or other items.

    Cable Management

    Optimize desk space and keep cables organized by installing cable management solutions such as clips, trays, or grommets.

    Lighting

    Improve desk lighting with a task lamp that provides adequate illumination for reading or working.

    Safety Precautions

    Remember to prioritize safety throughout the project:

    • Always wear safety glasses while using tools and handling sharp objects.
    • Handle power tools with care and follow manufacturer instructions.
    • Keep your workspace clean and organized to prevent accidents.
    • Take breaks when needed to avoid fatigue and maintain focus.

    Conclusion

    Building your own wood desk is an enriching endeavor that allows you to create a personalized workspace that reflects your style and needs. By carefully planning, following the steps outlined in this guide, and focusing on detail, you can achieve a beautiful and functional desk that complements your bedroom and inspires productivity.

    Downloadable Compost Bin Blueprints for Any Backyard

    Downloadable Compost Bin Blueprints for Any Backyard

    Downloadable Compost Bin Blueprints for Any Backyard

    Transform your garden waste into nutrient-rich compost with a homemade compost bin. These downloadable blueprints cater to various backyard sizes and styles, allowing you to construct the perfect composting solution for your space.

    Why Choose a DIY Compost Bin?

    Building your own compost bin provides numerous benefits, including:

    • Cost savings: You can save money by using readily available materials and avoiding expensive pre-made composters.
    • Customization: Tailor the size, shape, and design to fit your backyard aesthetic and needs.
    • Eco-friendly: Reduce your environmental footprint by diverting organic waste from landfills.
    • Enhanced gardening: Compost enriches your soil, promoting healthy plant growth.

    Types of Compost Bin Blueprints Available

    These downloadable blueprints cover a range of popular compost bin styles:

    • Three-bin composters: Three compartments allow for staged composting, promoting efficient decomposition.
    • Tumbler composters: Rotating drums facilitate faster composting and reduce odor.
    • Stacked bin systems: Ideal for smaller spaces, these designs utilize vertical stacking for compact composting.
    • Simple bin designs: Easy-to-build options for beginners, using readily available materials like pallets or wire mesh.

    Benefits of Downloadable Blueprints

    Here are some reasons why downloadable blueprints are a convenient and effective solution for DIY composting:

    • Detailed instructions: Clear and easy-to-follow plans guide you through each step of the construction process.
    • Material lists: Comprehensive lists ensure you have all the necessary supplies before you start building.
    • Printable format: Conveniently print out the blueprints and refer to them as you construct your compost bin.
    • Cost-effective: Free or affordable downloads eliminate the need to purchase expensive plans.

    Getting Started with Your DIY Compost Bin

    Ready to embark on your composting journey? Follow these steps:

    1. Choose a blueprint: Browse available plans and select one that suits your backyard size and desired style.
    2. Gather materials: Purchase or source the required materials based on the blueprint's list.
    3. Prepare your workspace: Ensure a clean and safe area for building your compost bin.
    4. Follow the instructions: Carefully adhere to the blueprint's step-by-step guide for optimal results.
    5. Start composting: Once your bin is assembled, begin adding your organic waste and watch your compost develop!

    Download your compost bin blueprints today and begin transforming your garden waste into a valuable resource. Enjoy the satisfaction of creating your own composting system and reaping the benefits of healthy, nutrient-rich soil.

    Complete DIY Squirrel Box Building Instructions

    Complete DIY Squirrel Box Building Instructions

    Build a Squirrel Box: A DIY Guide to Attracting These Curious Creatures

    Squirrels are a delightful sight in any backyard, their antics and playful nature bringing a touch of wildness to our urban landscapes. But providing them with a safe and comfortable shelter can encourage their presence and bring them closer to your home. This guide will walk you through the construction of a squirrel box, a simple yet rewarding project that will attract these charming critters and offer them a sanctuary in your yard.

    Gathering the Right Supplies

    To start your squirrel box project, you'll need a few basic materials. These can be found at most hardware stores, ensuring a convenient and affordable build:

    • Wood: Choose untreated, weather-resistant lumber like cedar, redwood, or pressure-treated pine. Avoid using treated wood for the interior as it can release harmful chemicals.
    • Screws: Use galvanized or stainless steel screws for longevity and weather resistance.
    • Saw: A circular saw or hand saw for cutting the wood to size.
    • Drill: A drill with a variety of drill bits for pre-drilling holes before screwing. This prevents the wood from splitting.
    • Measuring tape: For accurate measurements and ensuring all pieces are cut to the correct size.
    • Level: To ensure the squirrel box is straight and stable.
    • Safety Glasses: Protect your eyes from sawdust and flying debris.
    • Optional: Roof shingles, paint, or stain for additional protection and aesthetics.

    Constructing the Squirrel Box: A Step-by-Step Guide

    Now that you have your materials, let's dive into the construction process:

    1. Cutting the Wood

    Start by cutting the wood to size. The dimensions will vary depending on the design you choose. However, a standard size is 12 inches wide, 12 inches deep, and 16 inches tall. You'll need six pieces: two sides, two ends, a bottom, and a roof.

    Cut the two sides to 16 inches by 12 inches, the two ends to 12 inches by 16 inches, the bottom to 12 inches by 12 inches, and the roof to 16 inches by 12 inches. You can adjust these dimensions to your liking.

    2. Assembling the Base

    Lay the bottom piece flat on a work surface. Place the two sides on top of the bottom, ensuring they are flush with the edges. Attach the sides to the bottom using screws, pre-drilling holes to prevent splitting.

    Now, attach the two end pieces to the sides. Make sure the ends are also flush with the sides and the bottom. Screw the ends in place, remembering to pre-drill holes.

    3. Installing the Roof

    Once the base is complete, attach the roof. For a simple design, cut a 1/4-inch overhang on all sides of the roof. This will help prevent rain from seeping into the box. Use screws to attach the roof to the sides, creating a secure and weather-resistant closure.

    For added protection, you can add a layer of roof shingles or a weatherproof sealant on the roof.

    4. Creating the Entrance

    With the roof secured, it's time to create the entrance. Using a jigsaw or hand saw, cut a circular hole in the front of the box. This hole should be around 3 inches in diameter, allowing easy access for squirrels but discouraging larger animals from entering. The entrance should be located about 6 inches from the bottom of the box, providing a safe space for squirrels to rest and nest.

    5. Finishing Touches

    To finish the project, you can add some optional touches. If desired, sand the wood to smooth out any rough edges. You can also paint or stain the box, adding a personal touch and protecting the wood from the elements.

    Choosing the Perfect Location

    Once your squirrel box is complete, choose the best location to install it. This will ensure your furry tenants are comfortable and safe:

    • Choose a tree: Squirrels prefer a high location, so mount the box on a tree trunk at least 10 feet off the ground. This will protect them from predators and inclement weather.
    • Find a shaded spot: Select a location that provides some shade from direct sunlight, particularly in hot weather.
    • Consider safety: Ensure the box is securely attached and not accessible to predators or other animals. Place it in a quiet and secluded area, avoiding areas frequented by humans or pets.

    Welcoming Your New Tenants

    After installing the squirrel box, be patient. It may take some time for squirrels to discover their new home. You can encourage them by placing a small amount of food near the entrance, such as peanuts, sunflower seeds, or birdseed. Soon, your squirrel box will become a bustling hub of activity, as these playful creatures take advantage of the shelter you've provided.

    Building a squirrel box is not only a fun and rewarding project, but also a way to contribute to the local ecosystem. By providing these fascinating creatures with a safe haven, you'll be making a positive impact on their lives and enriching the biodiversity of your yard. So, gather your tools, put on your DIY hat, and start building a squirrel box today!

    Tips for Adding Personal Touches to a DIY Bedside Cabinet

    Tips for Adding Personal Touches to a DIY Bedside Cabinet

    Adding Personal Touches to a DIY Bedside Cabinet: Elevating Functionality and Aesthetics

    A bedside cabinet is more than just a piece of furniture; it serves as a sanctuary for cherished items, a source of comfort in the evening, and an extension of your personal style. While countless ready-made options exist, crafting a DIY bedside cabinet allows you to infuse it with your unique personality and cater to your specific needs. This article explores a comprehensive guide to adding personal touches to your DIY bedside cabinet, transforming it into a truly cherished and functional piece.

    Embracing the Material Palette: A Canvas for Creativity

    The choice of material plays a pivotal role in shaping the character of your bedside cabinet. Wood, with its timeless appeal and versatility, reigns supreme as the preferred material for DIY projects. However, consider exploring other options to imbue your creation with distinctive flair.

    Warmth and Texture: The Allure of Wood

    Wood, in its natural state or adorned with finishes, exudes warmth and sophistication, complementing a wide range of interior styles. Consider the following wood species:

    • Oak: Robust and enduring, oak offers a rich, warm tone, ideal for classic and rustic aesthetics.
    • Maple: Known for its light, creamy hue and fine grain, maple lends itself to modern and contemporary designs.
    • Cherry: Exhibiting a reddish-brown color that deepens with age, cherry imparts a timeless elegance to any space.
    • Walnut: Renowned for its distinctive dark brown color and striking grain patterns, walnut adds a touch of opulence and sophistication.

    Industrial Edge: The Rugged Charm of Metal

    For a contemporary and industrial aesthetic, incorporate metal elements into your bedside cabinet design. Metal frames, accents, or even a complete metal construction lend a sense of strength and modernity. Metal can be painted, powder-coated, or left in its raw form to enhance the industrial vibe.

    Contemporary Chic: The Elegance of Glass

    Glass, when judiciously integrated into your bedside cabinet design, adds a touch of contemporary elegance. Clear glass shelves or doors offer a sense of openness and showcase your treasured possessions, while frosted glass provides a touch of privacy and a soft diffusion of light.

    Adding a Personal Touch Through Design Elements

    Beyond the material choice, design elements play a crucial role in adding personal touches to your DIY bedside cabinet. Tailor your design to reflect your unique taste and create a piece that resonates with your personality.

    Playing with Shapes and Proportions

    Step away from traditional rectangular cabinets and embrace unconventional shapes. Consider rounded corners, asymmetrical designs, or incorporating curved elements to create a visually captivating piece. Experiment with different proportions, such as a tall and narrow design or a wide and low cabinet, to suit your space and aesthetic preferences.

    Embracing Unique Hardware

    Hardware, often overlooked, holds the power to elevate your bedside cabinet from ordinary to extraordinary. Choose drawer pulls, knobs, and hinges that complement your design style and reflect your personal taste. Opt for vintage brass hardware for a classic touch, sleek chrome for a modern aesthetic, or rustic iron for a farmhouse feel.

    Adding Architectural Details

    Architectural details, when incorporated subtly, add visual interest and depth to your bedside cabinet. Consider incorporating:

    • Moulding: Simple moulding around the edges of the cabinet, shelves, or doors adds a touch of sophistication.
    • Inlays: Intricate wood inlays or patterned inserts add a touch of craftsmanship and elegance.
    • Carving: Carved details, whether simple or elaborate, enhance the visual appeal and create a unique character.

    Finishing Touches: Bringing Your Vision to Life

    The finishing touches are where your bedside cabinet truly transforms from a simple piece of furniture into a reflection of your personal style. Explore a range of techniques to achieve the desired look and feel.

    Paint and Stain: A Palette of Colors

    Paint and stain provide endless possibilities for customizing your bedside cabinet. Select a color palette that complements your bedroom decor or reflects your personal preferences. Consider:

    • Neutral Tones: White, gray, and beige create a timeless backdrop, allowing other design elements to take center stage.
    • Bold Colors: Add a pop of personality with vibrant colors like blue, green, or yellow. Consider using contrasting colors for drawers or doors.
    • Distressed Finishes: Achieve a vintage or rustic look with distressed paint techniques, which involve lightly sanding or chipping the paint to reveal the wood underneath.

    Embellishing with Decoupage

    Decoupage, the art of attaching paper or fabric to a surface using glue and varnish, offers a playful way to add personal touches. Choose patterned paper, fabric scraps, or even old maps to create unique and eye-catching designs.

    Enhancing with Stenciling

    Stencils provide a simple and effective way to add intricate patterns and designs to your bedside cabinet. Use a stencil to create a subtle geometric pattern, a bold floral motif, or even a personalized monogram.

    Creating a Functional Haven: Maximizing Utility

    Your bedside cabinet should be not only beautiful but also highly functional. Consider incorporating features that enhance its practicality.

    Strategic Storage Solutions

    Maximize storage space by incorporating:

    • Drawers: Provide organized storage for books, personal items, and other essentials.
    • Shelves: Offer versatile storage for books, lamps, or decorative objects.
    • Hidden Compartments: Incorporate hidden compartments or secret drawers for keeping valuables secure.

    Integrating Lighting

    Add ambient lighting by incorporating:

    • Under-shelf Lights: Create a soft glow that illuminates your bedside table and books.
    • Built-in Reading Lights: Provide targeted lighting for reading in bed.
    • Cordless Charging Stations: Conveniently charge your electronic devices while keeping your bedside table clutter-free.

    Conclusion: A Personalized Sanctuary

    Creating a DIY bedside cabinet allows you to infuse your personal style and needs into every aspect of the design. By embracing the right materials, design elements, finishing touches, and functional considerations, you can transform your creation into a true haven of comfort, style, and practicality. Your bedside cabinet will become more than just a piece of furniture; it will be a cherished reflection of your unique personality and a testament to your creative journey.

    Diy guide to building a simple wooden desk

    Diy guide to building a simple wooden desk

    Crafting Your Own Wooden Desk: A DIY Guide

    Are you tired of the same old, boring office furniture? Craving a workspace that reflects your style and fits your space perfectly? Look no further! This comprehensive guide will walk you through building a simple, yet stylish wooden desk from scratch. Get ready to unleash your inner craftsman and create a desk that's both functional and beautiful.

    Gathering Your Materials and Tools

    Before you dive into construction, gather the necessary tools and materials. Don't worry, this isn't a complicated project; you can find everything you need at your local hardware store.

    Materials:

    • Wood: Choose sturdy, high-quality lumber like oak, maple, or pine. You'll need enough wood for the desktop, legs, and supports.
    • Wood glue: Opt for a strong, water-resistant wood glue for durable joints.
    • Screws: Select wood screws of appropriate length for attaching the various components.
    • Wood filler: Use this to fill any gaps or imperfections in the wood.
    • Sandpaper: Different grit sandpaper is crucial for smoothing the wood surface.
    • Stain or paint: Choose your preferred finish to enhance the wood's natural beauty or give it a unique color.
    • Polyurethane or varnish: Apply this protective coating to seal the wood and enhance its longevity.

    Tools:

    • Measuring tape: Essential for accurate measurements and cuts.
    • Circular saw or jigsaw: For precise cutting of the wood.
    • Drill: For drilling pilot holes and attaching components.
    • Clamps: Hold pieces of wood together while gluing or attaching.
    • Level: Ensure your desk is perfectly balanced and stable.
    • Safety glasses and gloves: Protect yourself from sawdust and potential hazards.

    Designing Your Desk

    Now, let's get creative! Before starting, sketch out your desired desk dimensions and design. Consider factors like:

    • Size: How much space do you have for your desk? Consider the dimensions of your room and your needs.
    • Shape: Rectangular, square, or perhaps a more unique shape? Explore different possibilities.
    • Style: Do you prefer a modern minimalist design, a rustic farmhouse style, or something else entirely?
    • Storage: Think about any drawers, shelves, or compartments you might need.

    Constructing the Desk

    With your design in mind, it's time to bring your desk to life! Follow these steps:

    Building the Desk Top

    1. Cut the wood: Use your saw to cut the wood planks to the desired length and width of your desktop.
    2. Join the planks: Use wood glue and screws to attach the planks together. Align them carefully for a smooth, even surface.
    3. Clamp and dry: Apply clamps to hold the planks together while the glue dries.

    Creating the Legs and Supports

    1. Cut the legs: Cut the wood for the legs to the desired height.
    2. Attach the supports: Depending on your design, create supports for the desktop using additional wood pieces.
    3. Secure the legs: Use wood glue and screws to attach the legs to the supports. Ensure they are positioned evenly and securely.

    Assembling the Desk

    1. Attach the desktop: Carefully place the desktop onto the legs and secure it using screws.
    2. Check for stability: Double-check that the desk is level and stable. Make any necessary adjustments.

    Finishing Touches

    You're almost done! Now comes the fun part รข€" adding the finishing touches to your desk.

    Sanding and Filling

    1. Sand the desk: Use sandpaper to smooth any rough edges and create a consistent finish.
    2. Fill imperfections: Fill any gaps or holes in the wood with wood filler. Allow it to dry completely.
    3. Sand again: Once the filler dries, sand the surface again to achieve a smooth, even surface.

    Staining or Painting

    1. Apply stain or paint: Choose your preferred finish and apply it evenly to the entire desk.
    2. Let it dry: Allow the stain or paint to dry completely before moving on to the next step.

    Sealing the Wood

    1. Apply polyurethane or varnish: This will protect the wood and enhance its beauty. Apply multiple thin coats for optimal protection.
    2. Allow to cure: Let the finish cure completely before using your desk.

    Congratulations! You've built a stunning, one-of-a-kind wooden desk. Enjoy your new workspace and the satisfaction of creating something beautiful with your own hands.

    How to Build a Birdhouse with a Rustic Finish for Country Charm

    How to Build a Birdhouse with a Rustic Finish for Country Charm

    Build a Birdhouse with Rustic Charm: A Step-by-Step Guide

    Hey there, fellow bird lovers! Are you looking to add a touch of country charm to your backyard? Building a rustic birdhouse is a fun and rewarding project that lets you create a welcoming haven for feathered friends. Whether you're a seasoned DIYer or a beginner, this guide will walk you through the steps, from choosing the right materials to giving your birdhouse that authentic, weathered look.

    Gather Your Materials and Tools

    Before you start hammering and sawing, make sure you've got all your supplies ready. You'll need:

    • **Wood:** Choose a weather-resistant wood like cedar, redwood, or pine. For a truly rustic look, use reclaimed wood or salvaged pieces.
    • **Wood glue:** A strong adhesive to hold the pieces together.
    • **Screws:** Use screws specifically designed for outdoor use to prevent rust.
    • **Saw:** A circular saw or a handsaw for cutting the wood.
    • **Drill:** For drilling pilot holes before screwing and for creating the entrance hole.
    • **Sandpaper:** To smooth out any rough edges and create a polished finish.
    • **Measuring tape:** For accurate measurements.
    • **Pencil:** For marking the wood.
    • **Level:** To ensure your birdhouse sits straight and level.
    • **Wood stain or paint:** (Optional) For adding color and protection.
    • **Weatherproofing sealant:** (Optional) To protect the wood from the elements.
    • **Birdhouse plans:** You can find plenty of free plans online or in DIY books.

    Selecting Your Birdhouse Design and Size

    Choosing the right design and size for your birdhouse is important for attracting the birds you want. There are so many beautiful and unique birdhouse designs out there, but it's crucial to keep in mind the types of birds you want to attract.

    Research Bird Preferences

    Think about which birds you see in your area and their nesting habits. Different birds prefer different sized entrances, depths, and internal dimensions. Some birds prefer houses with a flat roof, while others love a pitched roof for drainage.

    Consider Your Location

    The placement of your birdhouse matters too. Choose a spot that gets some sun but also offers shade from the hottest part of the day. A location out of the wind is best, and it's great if it's near a source of water.

    Building the Birdhouse: A Step-by-Step Guide

    Now that you've gathered your supplies and chosen your plan, let's get started! Here's a general guide to building your rustic birdhouse, but make sure to consult your chosen birdhouse plan for specific measurements and instructions.

    Step 1: Cut the Wood Pieces

    Using your saw, cut the wood pieces to the measurements specified in your birdhouse plan. Make sure your cuts are straight and precise. Be mindful of safety when using a saw and wear protective eyewear.

    Step 2: Assemble the Base and Sides

    Start by assembling the base of your birdhouse, usually four pieces of wood forming a square or rectangle. Glue the sides together, then secure them with screws. Apply a little wood glue to the edges before screwing. This will prevent the wood from splitting and create a stronger bond.

    Step 3: Add the Roof

    Next, attach the roof. Some birdhouse designs have a simple flat roof, while others have a pitched roof. Measure and mark the roof pieces and attach them to the base using glue and screws.

    Step 4: Create the Entrance Hole

    Carefully drill the entrance hole. Remember to choose the correct size based on the bird you want to attract. You'll need to drill a pilot hole first and then slowly enlarge it to the desired size.

    Step 5: Add Interior Details

    If your birdhouse plan includes interior features like a perch or a nesting platform, cut and assemble these pieces now.

    Step 6: Sand and Finish

    Once your birdhouse is assembled, sand it down thoroughly. Use different grits of sandpaper to get a smooth finish. This will create a more polished look and make it easier for birds to enter the house.

    Adding Rustic Charm: Finishing Touches

    Now comes the fun part! Let's give your birdhouse that unique rustic charm. Here are some techniques to try:

    Weathering the Wood

    For a truly rustic look, you can weather the wood yourself. You can achieve this with:

    • **Sanding:** Use a wire brush or coarse sandpaper to create a distressed and aged effect.
    • **Sun and Rain:** Allow your birdhouse to sit outside for a few weeks to naturally weather the wood.
    • **Wood Stain:** Apply a wood stain in a darker color to accentuate the natural wood grain and give it a weathered look.

    Adding Embellishments

    To make your birdhouse even more charming, consider adding some rustic details:

    • **Twigs:** Add a few small twigs to the roof for a natural touch.
    • **Rustic Hardware:** Use old-fashioned hinges, handles, or screws. Look for salvaged hardware for an even more unique look.
    • **Natural Elements:** Attach a small piece of bark, a pine cone, or a few dried flowers to the exterior.

    Tips for Attracting Birds to Your Birdhouse

    You've created a beautiful and rustic birdhouse, but you've got one more thing to do: make it inviting for birds! Here are some tips:

    • **Choose the Right Location:** As we mentioned earlier, a location with some sun, shade, and protection from the wind is key.
    • **Make it Safe:** Ensure the birdhouse is secure and won't fall or be knocked over.
    • **Provide Water:** Birds need water for drinking and bathing. Set up a bird bath near the birdhouse or hang a bird feeder.
    • **Keep it Clean:** Clean the birdhouse at the end of the nesting season to remove old nests and debris.
    • **Be Patient:** It might take a while for birds to discover your new birdhouse. Don't worry, they'll eventually come to check it out!

    There you have it! You're now equipped to build a rustic birdhouse that will be the envy of the neighborhood. Remember to have fun with the process, be creative, and personalize your birdhouse to make it truly unique. Enjoy the reward of watching your feathered friends make a home in your backyard!

    Cold Frame Plans Download: Easy Access

    Cold Frame Plans Download: Easy Access

    Cold Frame Plans Download: Easy Access

    A cold frame is an invaluable tool for gardeners seeking to extend their growing season and give their seedlings a head start. It's essentially a miniature greenhouse, providing a protected environment for delicate plants. But before you can start nurturing your seedlings, you need a solid plan. That's where cold frame plans come in. They are your roadmap to building a functional and sturdy cold frame that will serve you well for years to come.

    Why Download Cold Frame Plans?

    While you might find countless cold frame ideas floating around the internet, downloading detailed plans has several advantages.

    • Comprehensive Design: Plans provide a complete blueprint, outlining every dimension, material requirement, and assembly step, ensuring your cold frame is built correctly.
    • Clear Instructions: Step-by-step instructions eliminate guesswork and reduce the risk of errors, making the building process smoother.
    • Customization Options: Many plans offer variations and customization options, allowing you to tailor the cold frame to your specific needs and space.
    • Material List: Plans include a comprehensive material list, preventing last-minute trips to the hardware store and ensuring you have everything on hand.

    Where to Find Cold Frame Plans

    The internet is a treasure trove of cold frame plans. Here are some reliable sources to start your search:

    Free Resources:

    • Gardening Websites: Many gardening websites, like The Spruce, offer free downloadable cold frame plans.
    • DIY Blogs: DIY blogs, like Instructables, often feature detailed plans and step-by-step guides for building a cold frame.
    • YouTube: Many DIY enthusiasts share their cold frame building projects on YouTube, with tutorials and visual instructions.

    Paid Resources:

    If you're seeking more detailed, professionally designed plans, consider exploring these options:

    • Online Marketplaces: Etsy, Amazon, and other online marketplaces offer digital downloads of cold frame plans from independent designers.
    • Gardening Magazines: Many gardening magazines feature downloadable cold frame plans in their online archives or accompanying websites.

    Choosing the Right Cold Frame Plan

    Before you download plans, consider these factors:

    • Size and Space: Decide on the size that best suits your garden and the number of plants you intend to grow.
    • Material: Choose a material that aligns with your budget and aesthetic preferences. Popular options include wood, recycled materials, and even concrete.
    • Features: Think about any additional features you desire, such as venting options, a removable lid, or a built-in watering system.

    With the right cold frame plans in hand, you're well on your way to building a valuable tool for your gardening endeavors. So start planning, gather your materials, and get ready to enjoy the benefits of a well-designed and functional cold frame.

    Diy wooden clock ideas for crafting enthusiasts

    Diy wooden clock ideas for crafting enthusiasts

    DIY Wooden Clock Ideas for Crafting Enthusiasts

    Crafting enthusiasts are always looking for new and exciting projects to take on. Building a wooden clock is a rewarding experience that combines woodworking skills with creativity. From simple designs to intricate masterpieces, there are countless possibilities to explore. This comprehensive guide will provide you with a wealth of DIY wooden clock ideas, covering everything from materials and tools to step-by-step instructions.

    Materials and Tools

    Before embarking on your clock-making journey, gather the necessary materials and tools. These include:

    • Wood: Choose wood suitable for your project, such as plywood, pine, oak, or walnut.
    • Clock Movement: The heart of your clock, determine the size and type needed for your design.
    • Hands: Select clock hands that complement the style and size of your clock.
    • Wood Glue: Ensure a strong bond between wood pieces.
    • Sandpaper: Smooth out rough edges and imperfections.
    • Wood Stain or Paint: Enhance the look of the wood and create a desired finish.
    • Clear Coat: Protect the clock's surface and enhance its longevity.
    • Measuring Tape: Precise measurements are crucial for accuracy.
    • Saw: Cut wood pieces to size.
    • Drill: Create holes for the clock movement and hands.
    • Screwdriver: Secure the clock movement and hands.

    Simple Wooden Clock Designs

    For beginners, starting with simple wooden clock designs is recommended. These projects are less complex and require fewer tools and techniques.

    Geometric Clock

    Create a modern and minimalist clock using geometric shapes. Cut out squares, triangles, or circles from wood and arrange them to form a unique design. Paint or stain the pieces for a visually appealing contrast.

    Rustic Clock

    Embrace the beauty of natural wood by creating a rustic clock. Use reclaimed wood, such as weathered planks or pallet wood, to add a touch of vintage charm. Leave the wood's natural texture and knots visible for an authentic look.

    Slab Clock

    Utilize a thick slab of wood to create a statement piece. Sand the slab smooth and attach the clock movement to the back. Leave the natural edges of the wood exposed for a unique and organic feel.

    Intermediate Wooden Clock Designs

    As your skills progress, explore intermediate wooden clock designs that incorporate more intricate details and techniques.

    Engraved Clock

    Add a personalized touch to your clock by engraving a design or message onto the wood. Use a CNC machine or a hand-held engraving tool to create intricate patterns or meaningful words.

    Inlay Clock

    Elevate your clock-making skills with inlay techniques. Cut out designs from different woods and insert them into the base wood to create beautiful patterns and textures.

    Three-Dimensional Clock

    Create a visually stunning clock by adding depth and dimension. Construct a three-dimensional design using multiple layers of wood, creating a unique and eye-catching centerpiece.

    Advanced Wooden Clock Designs

    For experienced crafters, advanced wooden clock designs challenge your skills and allow you to create truly exceptional pieces.

    Turning Clock

    Use a wood lathe to create a clock face with a smooth, rounded shape. Experiment with different wood species and finishes to enhance the aesthetic appeal.

    Clock with Moving Parts

    Take your clock-making to the next level by incorporating moving parts. Design a clock with a pendulum, rotating gears, or a functional calendar mechanism. This adds both functionality and visual interest to your creation.

    Clock with Built-in Shelf or Storage

    Combine functionality and design by creating a clock with a built-in shelf or storage compartment. This adds a practical element to your clock and allows you to display other items alongside it.

    Tips for Success

    To ensure a successful and enjoyable DIY wooden clock project, follow these tips:

    • Plan Your Design: Sketch out your idea, consider the size, shape, and features you want to incorporate.
    • Choose Quality Materials: Use high-quality wood, a reliable clock movement, and durable hardware.
    • Take Your Time: Precision and patience are crucial for crafting a beautiful clock.
    • Sand Thoroughly: Smooth out any rough edges and imperfections for a professional finish.
    • Finish with Care: Apply stain, paint, or clear coat according to the manufacturer's instructions.
    • Test the Clock Movement: Before assembling the final piece, ensure the clock movement is working correctly.

    Conclusion

    Crafting a wooden clock is a rewarding and enjoyable experience that allows you to showcase your creativity and woodworking skills. From simple to advanced designs, there is a project for every skill level. With the right materials, tools, and guidance, you can build a functional and beautiful clock that will be a cherished piece for years to come.

    How to build a stylish wooden desk for your home office

    How to build a stylish wooden desk for your home office

    Building a Stylish Wooden Desk for Your Home Office

    In the contemporary world, where the home office has become an integral part of many lives, the desk stands as the centerpiece of productivity and style. A well-crafted wooden desk can transform your workspace into a sanctuary of functionality and aesthetic appeal. Building your own wooden desk allows you to personalize it to your exact specifications, resulting in a piece of furniture that is both practical and visually captivating.

    This comprehensive guide will lead you through the steps of constructing a stylish wooden desk for your home office. From selecting materials and planning the design to assembling the desk and adding finishing touches, we will cover every aspect of the process in detail.

    Step 1: Planning and Design

    The foundation of any successful project lies in meticulous planning. Before embarking on the construction journey, dedicate time to conceptualizing your dream desk. Consider the following aspects:

    1.1 Determine Your Needs

    What will your desk be used for? Do you need ample space for a computer monitor, keyboard, and mouse? Will you be working with physical documents, requiring drawers or shelves for storage? Consider your daily routines and workflow to ensure your desk meets your practical requirements.

    1.2 Define the Size and Dimensions

    Measure your available space to determine the ideal dimensions for your desk. Take into account the size of your computer, printer, and any other equipment you plan to use. Factor in the desired legroom and clearance for comfortable seating.

    1.3 Choose the Style

    Explore various desk styles to find one that complements your home office decor. Consider options ranging from modern minimalist designs to traditional farmhouse styles. Browse online for inspiration, visit furniture stores, and examine existing pieces in your home to identify a cohesive aesthetic.

    1.4 Select Materials

    The choice of wood for your desk will significantly impact its appearance and durability. Here are some popular options:

    • Hardwoods: Such as oak, maple, cherry, and walnut, known for their strength, durability, and beautiful grain patterns.
    • Softwoods: Such as pine and fir, often chosen for their affordability and ease of working with.
    • Engineered Wood: Including plywood and MDF, provide consistent quality, affordability, and stability.

    Consider the desired level of durability, budget, and aesthetic preferences when making your selection. Research the properties of different wood types to ensure they are suitable for your project.

    Step 2: Gathering Materials and Tools

    Once you have a clear design in mind, it's time to gather the necessary materials and tools. Here's a list of essential items:

    2.1 Wood

    Purchase the required amount of lumber based on your design plans. Be sure to order extra to account for potential errors or imperfections.

    2.2 Hardware

    This includes:

    • Screws
    • Wood glue
    • Hinges (if you're incorporating drawers)
    • Drawer slides (if you're incorporating drawers)
    • Knobs or handles (for drawers)
    • Legs (pre-made or custom-built)

    2.3 Tools

    You'll need:

    • Circular saw or table saw
    • Jigsaw or hand saw
    • Drill
    • Screwdriver
    • Clamps
    • Measuring tape
    • Level
    • Sandpaper
    • Safety glasses
    • Dust mask

    Step 3: Cutting and Assembling the Desk

    With your materials and tools ready, you can begin the construction process:

    3.1 Cutting the Wood

    Use the measurements from your design plans to accurately cut the wood components. Ensure clean cuts and precise angles for a professional-looking finish. Use a circular saw or table saw for straight cuts and a jigsaw or hand saw for curves or intricate shapes.

    3.2 Assembling the Top

    If your desk top is made of multiple pieces of wood, join them together using wood glue and screws. Clamp the pieces securely to ensure a strong and stable top. Use a level to check for evenness and make adjustments as needed.

    3.3 Constructing the Base

    Build the desk base according to your design plans. This may involve attaching legs, attaching a drawer frame, or building a shelf system. Use screws and wood glue to secure all components.

    3.4 Attaching the Top to the Base

    Align the desk top with the base and attach them securely using screws. Ensure the top is level and centered. If using pre-made legs, attach them to the base using the appropriate hardware.

    Step 4: Finishing Touches

    After assembling the desk, it's time to add those finishing touches to enhance its style and durability:

    4.1 Sanding

    Sand all surfaces of the desk using various grits of sandpaper, starting with a rough grit to smooth out any imperfections and progressing to a fine grit for a smooth finish. Sand in the direction of the wood grain for a consistent look.

    4.2 Staining

    Apply a wood stain to enhance the natural beauty of the wood and add color. Choose a stain that complements your desired aesthetic. Apply the stain evenly with a brush or rag, following the manufacturer's instructions.

    4.3 Sealing

    Apply a sealant to protect the wood from scratches, water damage, and wear and tear. Consider using polyurethane, varnish, or wax, depending on the desired level of protection and sheen. Apply multiple thin coats for optimal results.

    4.4 Adding Hardware

    Install any necessary hardware, such as drawer slides, hinges, knobs, and handles. Make sure these items are securely attached and operate smoothly.

    Step 5: Enjoying Your New Desk

    Congratulations! You have successfully built a stylish wooden desk for your home office. Take pride in your accomplishment and enjoy the functionality and aesthetic appeal of your handcrafted piece of furniture. Personalize your desk further with accessories that reflect your style and inspire creativity.

    Building your own wooden desk is a rewarding project that allows you to express your creativity and personalize your workspace. By carefully planning, selecting materials, and following the instructions outlined in this guide, you can create a desk that seamlessly blends function and style, enhancing the comfort and productivity of your home office.

    How to Build an Indoor Compost Bin: Download the Plans

    How to Build an Indoor Compost Bin: Download the Plans

    How to Build an Indoor Compost Bin

    Composting is a fantastic way to reduce waste and create nutrient-rich soil for your garden. However, the process can be messy and smelly, especially if you're composting indoors. Building your own indoor compost bin can help to contain the mess and control the odor, allowing you to compost year-round in the comfort of your home. This guide will walk you through the process of building a simple and effective indoor compost bin.

    Choosing the Right Materials

    The first step is to choose the materials you will use for your compost bin. Here are some popular options:

    Wood

    Wood is a classic choice for compost bins. It's readily available, affordable, and relatively easy to work with. Cedar, redwood, and pressure-treated lumber are good choices due to their durability and resistance to moisture. However, avoid using treated lumber that is chemically treated, as it may leach harmful chemicals into your compost.

    Plastic

    Plastic bins, such as those used for storing food or toys, can be repurposed for composting. They are lightweight, easy to clean, and often come with lids. Just be sure to choose a bin that is made from food-grade plastic and free from chemicals.

    Metal

    Metal bins are durable and can withstand high temperatures, making them a good choice for hot composting methods. Galvanized steel is a common choice for compost bins, but be sure to use stainless steel or other non-corrosive metals.

    Designing Your Compost Bin

    Once you've chosen your materials, you'll need to design your compost bin. Here are some factors to consider:

    Size

    The size of your compost bin should be determined by how much food waste you produce. A small bin, 2-3 cubic feet, is suitable for a single person or a small household. Larger bins, 5-10 cubic feet, can accommodate a family or those who produce a lot of food waste.

    Shape

    Square or rectangular bins are generally easier to build and fit well in corners. Round or cylindrical bins can be more challenging to construct, but they offer a greater volume for composting.

    Access Points

    Consider how you will access your compost bin for adding food scraps, turning the compost, and removing finished compost. You may want to include a hinged lid, a removable top, or a side door.

    Building Instructions for a Simple Wooden Compost Bin

    Here are step-by-step instructions for building a basic wooden compost bin:

    Materials

    • Four 4x4 lumber posts (for the frame)
    • Four 2x4 lumber boards (for the sides)
    • One 2x4 lumber board (for the base)
    • One 1/2-inch plywood sheet (for the top and bottom)
    • Wood screws
    • Wood glue
    • Measuring tape
    • Circular saw or hand saw
    • Drill
    • Level
    • Clamps

    Steps

    1. Cut the Lumber: Measure and cut the 4x4 posts and 2x4 boards to the desired dimensions for your compost bin. For a square bin, all sides will be equal in length.
    2. Assemble the Frame: Use wood screws and glue to attach the 4x4 posts together to form the frame of the bin. The posts should be placed at the corners of the bin.
    3. Attach the Sides: Cut the 2x4 boards to the height of the bin and use wood screws and glue to attach them to the inside of the frame, forming the sides of the bin.
    4. Add the Base: Cut the 2x4 board to the width of the bin and attach it to the bottom of the frame using wood screws and glue.
    5. Attach the Plywood Top and Bottom: Cut the plywood to the size of the bin opening and attach it to the top and bottom of the frame with wood screws. You can create a removable top by using hinges, or you can simply use a sheet of plywood that sits on top.
    6. Optional: Add a Door: If desired, you can create a side door for easy access to the compost bin. This can be done by cutting a rectangular opening in one of the sides and attaching a door frame with hinges and a latch.
    7. Finish: Once your compost bin is built, you may want to add a finish, such as paint or stain, to protect the wood and improve its appearance.

    Tips for Successful Indoor Composting

    Here are some tips to ensure your indoor composting is a success:

    Choosing the Right Location

    Select a well-ventilated area for your compost bin. Avoid placing it in a humid or airtight room, such as a basement or bathroom. A kitchen or laundry room are good options.

    Maintaining the Correct Carbon to Nitrogen Ratio

    Composting requires a balance of carbon-rich (brown) and nitrogen-rich (green) materials. Brown materials, such as shredded paper, leaves, and cardboard, provide carbon, while green materials, such as food scraps, grass clippings, and coffee grounds, provide nitrogen. A good ratio is about 2 parts brown to 1 part green.

    Turning the Compost

    Regularly turning the compost helps to aerate it and ensure that all materials decompose evenly. This also helps to control odors. You should turn your compost bin at least once a week.

    Monitoring Moisture Levels

    Compost needs to be moist, but not soggy. If the compost is too dry, add some water. If it's too wet, add more brown materials.

    Dealing with Odors

    Compost bins can produce odors, especially when they are first starting out. To reduce odors, add a layer of carbon-rich materials on top of your food scraps, turn the compost regularly, and make sure the bin is well-ventilated.

    Using Finished Compost

    Once the compost is finished, it will be dark, crumbly, and smell like rich soil. This can be used to amend your garden soil or start new seedlings.

    Conclusion

    Building your own indoor compost bin is a rewarding and environmentally friendly project. With a little effort, you can create a valuable resource for your garden and reduce your environmental impact. By following these instructions and tips, you can enjoy the benefits of composting year-round, no matter the weather.